Monday, September 23, 2013

Speed Blogging: Script that will add the contents of a spreadsheet cell to the end of a Google Document

Here is a script that will add the contents of a spreadsheet cell to the end of a Google Document that is specified in the Student File Key (here is a spreadsheet where you can Make a Copy):

// The onOpen function is executed automatically every time a Spreadsheet is loaded
 function onOpen() {
   var ss = SpreadsheetApp.getActiveSpreadsheet();
   var menuEntries = [];
   // When the user clicks on "writeToDoc Menu" then "Add the Student Note to the end of the Google Document given by the Student File Key", the function writeToDoc is
   // executed.
   menuEntries.push({name: "Add the Student Note to the end of the Google Document given by the Student File Key", functionName: "writeToDoc"});
   menuEntries.push(null); // line separator
   // add more entries to the menu by using the method: menuEntries.push({name: "Menu Entry 2", functionName: "function2"});

   ss.addMenu("writeToDoc Menu", menuEntries);
 }


function writeToDoc() {
  //Try to use a named range to pull the problemURL out of each row data. from:  https://developers.google.com/apps-script/guides/sheets#reading
  var ss = SpreadsheetApp.getActiveSpreadsheet();
  var sheet = ss.getSheets()[0];

  // Get the range of cells from that sheet.
  Logger.log(sheet.getMaxColumns());
  var studentInformationRange = sheet.getRange(2,1,sheet.getMaxRows()-1,sheet.getMaxColumns()-1);

  // For every row of student data, generate a student object.
  var studentObjects = getRowsData(sheet, studentInformationRange);

  for (var i = 0; i < studentObjects.length; ++i)
  {
   var currentStudentObject = studentObjects[i]  //get the ith row of data from the studentObjects array
 
   //This fetches a document by ID (found in the URL) and opens it up.
   var docID = currentStudentObject.studentFileKey;
    if (docID!=="") //if the Student File Key exists then use it otherwise, continue on to the next student
    {
     var doc = DocumentApp.openById(docID); //open the document specified by the Student File Key column entry
 
     //You could also use var doc = DocumentApp.create(name) to create a new document instead of opening an existing one.
     
     //find the end of the body of the document
     var body = doc.getActiveSection();
   
     //get the note for the student from the spreadsheet
   
     var studentNote = currentStudentObject.studentNote;
   
     //put the image into the body of the document found above. Got information from here: https://code.google.com/p/google-apps-script-issues/issues/detail?id=2459
     var seatProblem = body.appendParagraph(studentNote);
      };
    continue; //this makes the else part of my if loop continue on to the next student, used when the Student File Key is blank
   
   }
}

Thursday, September 19, 2013

Using Doctopus to create additional connections with students in class

+Andrew Stillman is a scripting demi-god. I have been using Doctopus in conjunction with gClassFolders. It has completely changed my workflow and my classroom. I have always used a lot of technology in my math classes, but Doctopus allows me to connect with my students in a meaningful way in real time.

I have already detailed in an earlier blog post about how I launch assignments from the gClassHub to my students.

Once my students have access to the document, they work on the assignment. Something unexpected happened at this step and changed my fundamental outlook on my teaching philosophy. I was clicking through the links on the Doctopus sheet to see the progress that my students were making and I was able to leave some comments for the students at points where they were making some mistakes or were unclear how to proceed.

It was a great interaction and I was able to impact students in real time in their documents when they were reluctant to admit they needed help. Having this alternate way to interact with them was really cool!


Speed Blogging: Google+ Hangouts Toolbox

I blogged earlier about how much I am loving the Google+ Hangouts on Air for screencasting. One of the cool features is the Hangout Toolbox. Download this app to add some extras to your video, like your name bar, country flag, and anything else you want to show in the lower third. 


Speed Blogging: Using Google+ Hangouts On Air as a Screencaster

One of the things that stops me from screencasting more is the software involved. I used to use Camtasia and Jing, but they both had their limitations and sometimes I forgot to upload them after the time it took to save the video (seemed like hours).
I just started using Google+ Hangouts on Air and it is perfect for what I want to do.

Just click on Hangout on Air:


Then you are in your Google+ Hangout on Air! I don't invite anyone and just ScreenShare to make my video. It goes live on youtube while I make it and then it is saved on Youtube afterwards for anyone to see and me to share, no uploading!!!


Speed Blogging: Creating a URLencoded text

The Google Chart API wants URLencoded text. To create URLencoded text, I use Mathematica, but you can also type it directly in here.:

http://meyerweb.com/eric/tools/dencoder/


Speed Blogging: Adding a menu item to a Google Spreadsheet by script

Here is the code to add a Menu to a Google Spreadsheet by code:

//creating the Menu in the onOpen function from: https://developers.google.com/apps-script/reference/spreadsheet/spreadsheet#addMenu(String,Object)

// The onOpen function is executed automatically every time a Spreadsheet is loaded
 function onOpen() {
   var ss = SpreadsheetApp.getActiveSpreadsheet();
   var menuEntries = [];
   // When the user clicks on "addMenuExample" then "Menu Entry 1", the function function1 is
   // executed.
   menuEntries.push({name: "Add teachers that are going to be out to the Calendar", functionName: "subCalendarEditor"});
   menuEntries.push(null); // line separator
   // add more entries to the menu by using the method: menuEntries.push({name: "Menu Entry 2", functionName: "function2"});

   ss.addMenu("Substitute Calendar Editor", menuEntries);
 }

Speed Blogging. How to type pretty math: Google Charts API to render LaTeX items

Did you know you can still use LaTeX in Google?

Google used to allow LaTeX directly into their Insert->Equation in Google Docs. Now that has been depricated. But, the fuctionality still exists (albeit in a limited scope) in the Google Chart API!

Just enter the URL: 
http://chart.googleapis.com/chart?cht=tx&chl=

and finish it off with the URLencoded LaTeX you want to use.

Don't know LaTeX? You can use the snippets from the CodeCogs LaTeX Equation Editor.

I have my math problems hosted in a Google Spreadsheet. (I create them using Wolfram's Mathematica, but again that process is for a future blog post) I use LaTeX form and push them through the Google Chart API so they have nice math type. For example if I wanted to have them simplify the expression 3x-2y, I use the URL:


which yields:  

This is helpful when I use exponents or fractions, because 
 and 

looks much better than 3x/2 and 2^((3x)/2).

Speed Blogging

I have seen a lot of conference talks posted about speed geeking and some great 1 minute instructional videos on youtube. What holds me back from blogging more is creating fully functional, comprehensive blog posts. I am trying to blog more and sometimes I can't even find some smaller snippets of information that I really want (they are hidden in these long blog posts). So I am going to start "Speed Blogging". My goal is to have short blog posts with only 1 or 2 main points that are succinctly described (and will be easier for me to find in the future).

Sunday, September 8, 2013

Sidebars in Google Docs

So as of May 22, from the I/O Google (you can watch it here) released an API (or maybe an SDK, I am not positive of the acronym but it is the documentation for the classes and methods) for Documents and some other great stuff.
I have been playing around with creating some scripts that are container bound (they can only be used in one product). One of these has been the sidebar creation in Documents.
You can see here I created a sidebar called "My Custom Comments". You can also create your own menu items and I created a menu called "My Custom Comments Menu" as well.

Here is the code I used to create the sidebar:
//create a sidebar with width 300 called My Custom Comments. The inside of the sidebar is populated //by index.html
function showSidebar() {
  var ui = DocumentApp.getUi();
  var html = HtmlService.createHtmlOutputFromFile('index').setTitle('My Custom Comments').setWidth(300);
  ui.showSidebar(html);
}

Now the important part of this script to run is I need to add the html file to the script. I go to File->New->Html file.

This is the really cool part!!! I can insert Html code into the sidebar content!!! Here is what I did with a quick snippet of code.
You can see that the 4th line of code tells the html to run the method addParagraphSign() in the script that I have in the Code.gs.
The html does limit some things, like iframe, embed, and some other things (unfortunately you still cannot embed Wolfram CDF files.
Here are the methods addParagraphSign and addParagraph:

//repeat this code for each custom comment you want to put just change the text in the quotes ' add a new paragraph here'
function addParagraph(){
  //From: https://developers.google.com/apps-script/reference/document/cursor
  // Insert some text at the cursor position and make it bold.
 var cursor = DocumentApp.getActiveDocument().getCursor();
 if (cursor) {
   // Attempt to insert text at the cursor position. If the insertion returns null, the cursor's
   // containing element doesn't allow insertions, so show the user an error message.
   var element = cursor.insertText(' add a new paragraph here ');
   // possibly try to use .insertInlineImage to add an image blob
 
   if (element) {
    element.setBold(true);
   } else {
     DocumentApp.getUi().alert('Cannot insert text here.');
   }
 } else {
   DocumentApp.getUi().alert('Cannot find a cursor.');
 }

}

function addParagraphSign(){
  //From: https://developers.google.com/apps-script/reference/document/cursor
  // Insert some text at the cursor position and make it bold.
 var cursor = DocumentApp.getActiveDocument().getCursor();
 if (cursor) {
   // Attempt to insert text at the cursor position. If the insertion returns null, the cursor's
   // containing element doesn't allow insertions, so show the user an error message.
   // possibly try to use .insertInlineImage to add an image blob
   var pilcrowUrl = "http://www.merriam-webster.com/top-ten-lists/top-10-words-you-didnt-know-vol-2/top10_unknown2_pilcrow_sm.gif";
   var pilcrowBlob = UrlFetchApp
                          .fetch(pilcrowUrl)
                          .getBlob()
                          .setName("pilcrowBlob");
 
   var element = cursor.insertInlineImage(pilcrowBlob);
   if (element) {
   
   } else {
     DocumentApp.getUi().alert('Cannot insert text here.');
   }
 } else {
   DocumentApp.getUi().alert('Cannot find a cursor.');
 }

This is pretty cool to now have a Custom Menu for items to insert into a document inline by clicking on the button. (Thanks to +Michael Wacker for the #autoAwesome tip in the #gafesummit talk, take multiple screenshots and then upload to G+ to create the animated gif!!!)


Saturday, September 7, 2013

Adding images into Forms with Scripts

While I have been working on inserting images into a Doc, I have been playing around with the forms scripts APIs and I made a quick script to add images as questions (I use LaTeX coding pushed through the Google Chart API to make nice math type). It is a bit clunky, especially since image items aren't questions, but if you put a blank text item afterwards, it will be the response repository for the image item.
Here is a link to the Form and my script is contained in the tools:

https://docs.google.com/a/saisstudent.sg/forms/d/1385oZ3maxBYO3nPHmVBo2Tik2IKAPCSNoTtGq3pXFFk/edit?usp=sharing

Here is the script:
function addLaTeXItem() {
   // Open a form by ID and add a new image item from a URL
 var form = FormApp.openById('1385oZ3maxBYO3nPHmVBo2Tik2IKAPCSNoTtGq3pXFFk');
 var problem = UrlFetchApp.fetch('http://chart.googleapis.com/chart?cht=tx&chl=4+x-3+y');
 form.addImageItem() //add an image item
     .setTitle('Your Seat Problem: Please write your answer in the box below the problem')
     .setHelpText('Solve This Problem') // The help text is the image description
     .setImage(problem); //the actual image
 form.addTextItem() //puts a blank text question below so the student can answer the imageproblem
     
}

Tuesday, September 3, 2013

gClassHub saves me days of my life during 1 school year!

In my last post I detailed how I begin the Googlefication of my classes using gClassFolders. The folder structure setup is awesome. But the real ROI for me comes from the gClassHub. I try to run almost all my assignments through my Google Drive and distributing these documents to students can be time consuming.
Enter the gClassHub.

What do you need to access the gClassHub?

1. You need to have used gClassFolders to setup your Google Drive structure. Once you run Create New Folders and Shares, an extra option comes up in the gClassFolders menu.

Before:

After:

The new option of Get gClassHub URL will generate the URL for us. Click on this option and the popup tells you to click the link.
Click the link. Sometimes you will get an error if you are logged into multiple Google email accounts. You can avoid this by doing 1 of 2 things:
1. Use the Incognito window.
2. **My preferred method** Use Google Chrome Users: Chrome User Setup Instructions.

This will go to a website where you can choose your class and then launch 1 of the 3 prepopulated scripts. These scripts were created by +Andrew Stillman (who is awesome and has tons of great scripts). +Jay Atwood also has tons of great Youtube videos with walkthroughs of some of the scripts. Check out his awesome playlist of videos on scripts!


Now you can Launch the script of your choice. In my next post, I will talk about Doctopus!


gClassFolders Revisited

So it is the beginning of the school year again and I have a bunch of new classes and new students that I want to share Google Docs with.

The first step in my Googlefication process is to use gClassFolders to create a Google Drive structure that connects me to my students. In my book +Bjorn Behrendt and +Andrew Stillman are demi-gods for creating this script. The bonus from this is the creation of the gClassHub URL, which I will detail in a future post and is essential for my workflow.

Here is how I setup my class (techwise) at the beginning of the year:
1. Start by running gClassFolders. You can also go here and File->Make a Copy: gClassFolder Google Doc

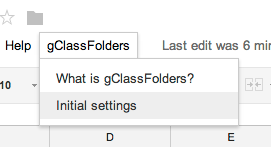
2. You will first need to Initialize the gClassFolders scripts by clicking Initial Settings on the header:

You will need to Authorize the script to run during this step.


3. After Authorizing, nothing will happen. You need to click on Initial Settings again:

4. After clicking Initial Settings, the Popup window will ask you to choose

I don't alter these settings at all and just hit Save. This will cause a script to run that sets up the Spreadsheet for you to enter the student information. 

It also creates another tab in the Sheet, but you will not need to do anything on this tab.
It will also create new menu options under gClassFolder


5. Enter the student Data into the Spreadsheet.
6. Create new folders and shares from the gClassFolders list. This is where the White Magic happens (to quote +Jay Atwood ). You will see the script running and it will create a new Properties Tab (you don't need to mess with this at all) and then populate the sheet with all of the student names with a bunch of information about the folders it created for the students to share in your Google Drive (again, you don't need to worry about this unless you want to move the student or delete only that student).


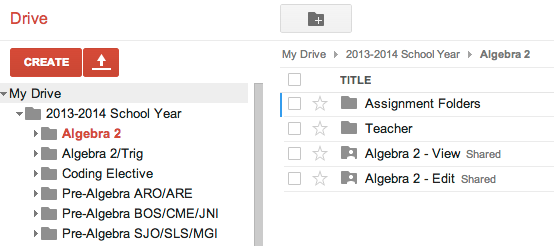
Now, you will have all of your students in a Google Drive structure where:
1. You have a folder for each class
2. Within each class folder, you have 4 folders, 3 of which are shared with students:
  • Class View-where each student in the class can only view any item put in the folder.
  • Class Edit-where each student in the class can edit any item put in the folder.
  • Assignment Folder-contains 1 folder for each student in the class. Only yourself and the student can edit the items in the folder.
I put all of these class folders in a parent folder called 2013-2014 school year for better organization:


This is a great way to disseminate information to students, especially utilizing other white magic scripts like Doctopus and following up with the Goobric grading rubric (a future post to come).